|
|
|
Categories
|
|
Information
|
|
Featured Product
|
|
|
 |
|
|
There are currently no product reviews.
 ;
THIS MANUAL IS VERY GOOD AND VERY CLEAR
PLEASE NOTE IT DOES NOT CONTAIN THE SETUP INFORMATION TO ALIGHN THE GEARS IN THE CD MECH IT DOES SHOW ALL THE PARTS AND THEIR LOCATIONS .
;
Complete service and operation manual. All schematics are there, all circuit boards AND add-on boards. Including exploded views ,component names and specifications. Also electrical and mechanical adjustment procedures are in this manual. This manual also covers the more advanced BR-S811E unit. Scan quality is fair and usable.
 ;
High quality scan of original Service Manual. Everything´s fine!
;
Good scan of the original service manual. All schematics and adjustment procedures are there. It helped me to fix a long lasting problem with the tracking circuitry. The manual also includes the supplementals 1,2 and 3. Included are; electrical schematic's , pcb layout's, mechanical drawing's and exploded views, disassembly manual and maintenance procedures. 236 pages.
;
The Service Manual received was helpful. The electronic information is exactly what I needed.
I recomend all of my friends about this technical page.
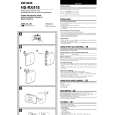
Mechanical adjustments
To adjust the ADF height
The height of the ADF is adjusted by lengthening or shortening the left and right adjusting bolts (callout 1) so that the distance between the two rubber feet (callout 2) at the rear and the horizontal size plate (callout 3) on the copyboard glass (callout 4) is 0.2±0.1 mm (the thickness of two sheets of 64 g/m2 copy paper) when the ADF (callout 5) is closed, and the feet (callout 6) at the front are in contact with the copyboard glass. To adjust the ADF height, follow these steps: 1 2 Turn the copier off. Remove the ADF to expose the adjusting bolts. (See �Removing the ADF� on page 378.)
2
2 5 2 6
2 7 2 3 2 1
Figure 32. Adjusting the ADF height 3 Loosen the lock nuts (callout 7) and turn the bolts of the left and right supports to raise and lower the ADF.
2 4
Note
After adjustment, tighten the nuts (callout 7) to lock them. 4 5 Replace the ADF and recheck the height. Repeat steps 2 and 3 as necessary. After adjustment, check to make sure that both the left and right rubber feet at the front of the ADF are in contact with the copyboard glass. If not, adjust the height of the magnet at the front of the ADF.
EN
ADF adjustments 141
|
|
|
> |
|